Blog Archive

Friday, July 8, 2011

Fun and Easy Headband tutorial for babies..girls..and grown ups too! :)

So I'm a HUGE fan of Pinterest.... Not sure if any of our followers are signed up on there - but it's free and wonderful. You do need to be invited by a current member - so If interested leave your email or message us at contactowlbee@yahoo.com for an invite. So with all the fun tutorials I've come across, this has easily become my favorite. It's actually a combination of 2 different tutorials into one. I do best with seeing actual pictures when checking out a tutorial, so that is what I've done for you. Hope you enjoy and please feel free to leave questions or comments or share some tutorials you LOVE. Also we are participating in a HUGE giveaway this month with my favorite photographer Little Lane Photography - If you would like to WIN ONE OF THE HEADBANDS IN THIS TUTORIAL   Then click on the link BELOW for contest entry info..there are a TON of other great give aways as well ... Scroll down towards the bottom and you'll find OWLBEE!


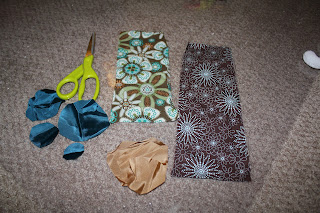
Tutorial Time: Below is a picture of the fabrics I used. You need some taffeta and some regular fabric...I actually used scrap fabric since size is not an issue.
*Cut out circles (don't worry about them being perfect - imperfections are a + here) Make a large circle, then a slightly smaller, and another smaller, and then a baby circle...you can use only 3 or do up to 5 circles depending on the size you want your flower to be. I stuck with 4 circles for this one.
*Cut strips of fabric, you can choose the width and the length (The longer the fabric is the larger your pinwheel will be.) 

* Grab a candle and make sure you turn on a fan or have some ventilation for this step...
 *Now your going to slightly burn the edges of the taffeta... You want to keep the fabric away from the flame and hold it on the edge and find the "heat spot" Don't hold it in one place too long or it will catch on fire O.o !!!! Keep rotating until your happy with the look of the flower! **Pardon my purple glitter chipped polish on my thumb :P )


*Here's what it looks like after it's been crisped up a bit ;)

*Both colors done...each have 4 circles...Set those aside OR if your only making these scroll down a bit to find the steps for completing them.

* Next we're going to create our  fabric pinwheels...Take your strip of fabric and grab a glue gun OR fabric glue and glue both corners down to create your starting point. It was hard to take a picture of the wrapping step b/c you need both hands... so I will explain it the best I can... After you get your starting point (pictured above) then start twisting and wrapping at the same time (wrapping around your starting point) every little bit you'll want to add a drop of glue to hold it in place (Hot glue gun works best) keep wrapping and twisting until your almost out of fabric....
 *Use the last little bit of fabric (tail) and glue it to the bottom of the flower to add support...feel free to trim away any excess fabric from the (tail) piece on the bottom.

*Top of flower...now we just need to add a middle embellishment...that will come in a few - You want to let it dry.

All four of our flowers almost done - Just need top embellished and to glue the taffeta flowers together.. Pardon the scissors, I wanted them in the picture to help show you the size.*

*FINAL STEPS for TAFFETA flowers - You want to use Fabri Tac glue for this step or hot glue works as well. place a small dot of glue in the center of each petal and attach the petals to one another... Then pick a pearl or button or any other embellishment and glue it to the center. I usually let these dry for a bit after this step.


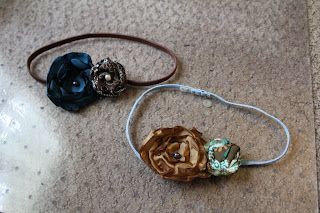
*Showing both flowers with the top embellished and attached to headband... To see how to attach them to a headband keep scrolling :)

*Other pair :)


How to attach to a head band... You'll need Felt - black or white works... Then you'll want to glue your flowers to the felt... glue them onto a larger piece of felt and trim away excess after you've glued them. Above I attached both flowers to the same piece of felt to keep it less bulky and more comfortable....after you trim away the excess felt put a large amount of glue on the headband and the felt...then take another piece of felt and sandwich the headband in between the two pieces and press firmly to secure it. and TAD AA! :)


Hope you enjoyed this tutorial, and remember if you would like to WIN one of these headbands then be sure to check out Little Lanes Blog and enter the contest . http://littlelanephotos.blogspot.com/2011/07/bon-voyage-give-way_07.html

Photobucket

Friday, June 3, 2011

Why choose cloth?

Please pardon this post in advance. We are smack dab in the middle of a move and just as the Internet guy came to move my connection down the street a thought occured to me. So I am posting from my phone( all hopped up on allergy pills too)

I Watched a video of a mom illustrating the use of diaper liners when I saw a comment about how much of a hassle it seemed to cloth diaper.

Is it more work than sposies? Yup.
Is it kinda stinky? Oh yes
Is it worth it? Abso-freaking-lutely

Even if you arent doing it to pass down a healthy planet to your descendants, or to save some seriousy moo-lah, there is still a good reason to do it.

The other reason occurred to me while reading the hassle comment and it is:

Saying it is too much work to do cloth is like saying it's too much work to make your kids food from real ingredients. As a society we have become too accustomed to having everything done for us. Someone else will make my food and someone else will deal with all of the trash I throw out. We trust that these companies will choose what is best for us but in reality they are never concerned with what is in our best interest but with their own bottom line. We need to take back responsibility for our own well being by knowing what is in our food and being in control of the chemicals we expose ourselves to.

I know cloth does not work for everyone but I think more often than not we just make excuses for why it won't work. I know I did when I had my first. I'm just glad was able to make the changes I am, knowing I have done my best.


Photobucket

Saturday, May 28, 2011

Nursing Pads....Which to wear and not to wear...that is the question!

Nursing pads.... Could they be anymore annoying?? At night I just want to jump into bed without tearing open 2 nursing pads and stuffing my bra...However, I don't HAVE to wear nursing pads throughout the day anymore, THANK GOODNESS...not since around month 2 when my milk supply became regulated... BUT I do still have to wear nursing pads to bed every night... (not nursing for 11 hours during the night) And I have found that I like to wear them during the day sometimes if the shirt I am wearing is thin...Breastfeeding leaves certain things poking through if you know what I mean... ! So since I find myself STILL purchasing nursing pads I thought it might be a light and easy post.... There are a TON of different brands and styles out there....from disposables to silicone reusable...to terry cloth...to bamboo... It all kinda sounds like Cloth Diapers if you ask me :)

    Even though I cloth diaper I have found that I cannot rely on the cloth nursing pads out there....It's true I have only tried one brand - a pretty inexpensive one at that. BUT I hate waking up in the morning with a wet t-shirt.....no wet t-shirt contest for this momma!!!!! Please if you have found a cloth style nursing pad that you LOVE, then you have to share with all of us :)

    So the brands I've tested are as follows....
-Lansinoh Nursing Pads.. This has become my most dependable nursing pad to date...It's super absorbent and is pretty thin..which means it doesn't show through clothing!
-Lily Padz Reusable Nursing pads...I loved the idea of these nursing pads...However I feel the "stick" gave out after on about a month or two of use. I even purchased the special cleaner that was suppose to help keep them tacky. I did love how discreet they were and the fact that I didn't have noisy paper rustling around in my bra... Another down side to these was I never knew where to put them while I was nursing...Anything they touched stuck to the backing.
-The first years with lanolin...These are my top pick for NEW nursing moms. They are a little thicker than the Lansinoh which is great for extra absorbency AND they have lanolin applied to the center of each pad...Pretty genius I know!
-Simplisse Disposable pads... Now I actually haven't tried these. BUT they are ordered from my FAV Amazon and should be arriving Wed. I have heard great things about them and I feel at this point in my nursing game that I deserve the thinnest pad on the market... I'm excited to test it out and get back to you all :)
-And sadly I can't remember or find my purchase history on Amazon for the cloth/washable pads I had tried...I will update this post when and If I find that info....I am curious to which you have found to work best for you and why. I am SUPER interested in finding some awesome cloth nursing pads, so again please share if you know of some ;) Happy Memorial weekend Mommas!!!!!!


Photobucket 

Thursday, May 26, 2011

Meeno Baby cool me stroller/carseat liner!!! LOVE THIS!!!!

   We live in FLORIDA, to say it's smoldering outside is a slight understatement. I felt so bad that she was getting so hot and sweaty while riding in the jogging stroller, even with the sun canopy over her. I started researching some options and a friend of mine actually had commented under one of my fb pics I had posted of sweaty Jema passed out while on a run.... She said and I quote ;)
*** you need the meeno baby for your stroller! :)
I was like...a what??? So I googled Meeno Babies to check it out. It was exactly what I had been hunting for!!! Thank You Melissa :P I love having friends with smart shopping taste! Here's the picture that she posted under...My poor hot, sleepy baby! I need to take a pic of the stroller WITH a Meeno baby attached, I will do that and add it after nap time!


   I'm super happy to report that today was our first day using the Meeno Baby and we're in love!!! It's a universal fit so it fits most strollers AND car seats! She was not sweaty at all...just a little warm which is unavoidable in this HEAT! I highly recommend this product to moms that are or planning on working out with baby in tow or even just a day at the park or Zoo...and don't forget you can also use it in a car seat for those road trips or extremely hot summer days when your scared to set your baby down in a hot car seat. :)

Photobucket

How I entertain and contain my 8 month old!


         I was playing with Jema this morning and it struck me that I should post about all the fun things we do in our day and how to baby proof a room - Entertaining and stimulating a mobile baby takes a lot more work than entertaining a baby that is content laying on an activity mat! haha!
    Gone are the days of rocking and holding Jema all day long....Feeding...Burping...Changing Diapers repeat....repeat..repeat... The days of entertaining a crawling adventurous baby have arrived! I remember wishing for this time to hurry up and arrive, but now that it's here I sometimes miss my fragile and needy infant.

     Don't get me wrong...I can't believe how many new things she is doing over this past month... But I'm always keeping my ears peeled and eyes open and waiting for her to find some microscopic fiber that has been left on the floor. I now understand that when I don't hear anything....I better investigate or my entire book shelf could be destroyed.

    So this is what I've found to work for us at this age.... I have baby proofed our computer room...and when I say baby proof I mean BABY proof and toddler proof. This has turned into our play room which works out great b/c I can sit at my computer sometimes while my little Brownie plays :) So it's a mommy/baby play room of sorts! I think it's a great idea to have at least one room in your home that can become the babies space to explore, play, and become comfortable in leading to furthering milestones! I have put up a baby gate keeping the dogs out of this area of the house...for cleanliness and to just protect them from Jema's death grip on their fur! :)  So just in the week since we have zoned this as her area we have been having a blast!!!! I play baby Einstein on the computer at times and baby signing as well... then her favorite thing is for me to lay on the ground with her and play and let her crawl all over me...I guess moms make good jungle gyms!!!! haha. And then I get some computer time to browse and play a little on the computer and post on here all while she's happily playing right near me safely! The pictures that follow are the things we got to baby proof this room.


     At this age I've noticed that they really enjoy the feel of freedom... It's like turning 16 and finally getting your Drivers License..you just want to GO GO GO, same thing happens once they learn to crawl - So I think I have managed to give her the illusion that she can rome free and far...I'm sure in a few months she will be crying at the gate to be set free, but for now I have a very happy and productive baby! I should mention that she not only has rein over the computer room but of the hallway and her whole bedroom...

      Another great thing for that's great for entertaining them is to go outdoors...Florida is HOT right now and will only get HOTTER as the summer progresses...So we make sure we got out early in the morning for a walk..She really enjoys this and I've read that it's great for their sensory development to see and hear all the things outside! And not to mention it's good for us moms to get outside and move a bit!!! That's my favorite time to listen to music or listen to audio books <3

   Between all these things and Naps we pretty much have a full day everyday... Being a mommy is such an important JOB and I am constantly trying to better myself as a mother...If you can think of any suggestions or if your willing to share some of your entertaining tricks please comment BELOW :)


Photobucket

Tuesday, May 24, 2011

Goodbye stink!!!

After I wrote this post about hitting a wall, I went to work getting to the bottom of my stinky dipes. I am happy to say I think I have it all figured out!
Florida is notorious for hard water, REALLY hard water. I think I had mineral build up in my diapers and that is where the stink was coming from. So after doing the RLRto get extra detergent out I started adding a cup of vinegar to each diaper load(and most of my clothing loads) to work on the mineral deposits. I can get a gallon and a half of white vinegar for $3.57 at Sams and like I said before, it is a great softener and helps to clean out my washing machine too.
So the stink is gone out of all but the worst dipes. The boys have both been on antibiotics since it turned out Kayden was the carrier monkey in the family and had been infecting Adam and I over and over with Strep Throat. That caused some major blow outs that I will have to sun but all of the other dipes are great!

Photobucket

Tuesday, May 17, 2011

When daddy is in charge...

Since my husband was working 80-100 hour weeks when our first was born until just last year, he escaped changing diapers. In fact he was not around to do much with Kayden as a baby.

Now that he is on a regular schedule(yay!) we work well with divide and conquer. Adam is in charge of Kayden and I handle Liam when we are all at home. It works really well and Adam gets to avoid diapers even more.
When I made the switch to cloth, he was very supportive, in part because he doesn't change diapers anyway!

When daddy is in charge of both kiddos I can bet Liam's diaper wont be changed so I make sure he is in a fresh one before I leave. Since I am still breastfeeding I am not ever gone more than three hours anyway.

I guess Liam wanted to make sure his daddy gets plenty of cloth experience because the last few times I have left both kids at home, he has had major blow outs! On Saturday he had two explosions with the dreaded'poop up the back', all in the space of three hours.

The funny things about this is I never know where he is going to put the dirty diapers. They typically get left beside wherever Liam was changed and end up leaking pee into whatever the diaper has come in contact with. I have to roam around the house and find the dirty dipes and put them in the wet bags, the location and use of which Adam is fully aware of.

So on Sunday night when I discovered my purse smelling so strongly of ammonia I thought I was going to pass out I had to to retrace my steps. Actually my sister prompted that thought after I shoved what I thought was a clean diaper in her face and told her to smell my newest cloth woe. She dismissed my ammonia build up concerns and said "well, are you sure it was clean?".

Turns out Adam had changed a pee diaper, opened the door with the wet bag hanging on it(pretty sure he had to touch the darn thing in order to open the door too) and put the diaper on top of the dryer, next to a stack of clean diapers I had made earlier that day.

We all got a good laugh and I was sure my wonderful husband understood the importance of the wet bags.

Then last night I came home to a poopy diaper sitting on the rocking chair pad, leaking all sorts of lovely-ness onto the pad.


Photobucket

Thursday, May 12, 2011

Hitting a wall

I havent been posting all that much lately and there are a few reasons for that. One, we got strep throat for the THIRD time since late January. We cannot figure out what is going on so our next step is to swab the whole family to see if one of us is a carrier.

Then we found out that the home we have been renting has been foreclosed on and we need to move. Moving is all consuming for me so if I am on my computer it is to look at listings. Luckily it looks like we may just move a few doors down which is awesome because we adore our neighborhood. We will find out when and where we will move in the next week, so for now I am trying to relax until we know what is going on.

And finally, I have hit a wall. A cloth diaper wall filled with some very stinky diapers. It all happened after Liam started solids. The dipes would smell fine after washing but when I would open the dryer I would be overwhelmed by the lovely smell of hot poop.

I set about doing everything I could to get the smell out. I used RLR, which did a great job of getting stains out. I stripped with Blue Dawn(1tsp for Front Loaders and 1tbs for Top Loaders) added in the wash cycle and followed with rinse cycles until there were no bubbles. I have added vinegar(a great softener by the way!). I have used a few types of detergent(Rockin Green, Charlies, 7th Gen, Arm and Hammer) but the lingering stink is still there in both the pockets and inserts and now even slightly in my prefolds. I stopped putting a cloth dipe on Liam during the night. Not because it was leaking but because he smelled like pee every morning when i went in to get him.

I am working on a few other fixes that other cloth diapering mommas have suggested. I am also thinking about bringing my entire stash to my mom's house and wash them/sun them there(which is news to my mom- Hi Mom!).

Even with this stinky wall I have hit, I am still happy with my decision to cloth diaper. In reality, the diapers only stink when I bury my face in them or if Liam is in need of a change. I knew this was something that could happen and that it could be difficult to fix.

I wanted to put this post up, not to discourage those who are thinking about cloth, but to portray an accurate picture of what cloth diapering entails. When you research cloth you see all of these fluffy pieces that only talk about the good points(of which there are many) of cloth but never discuss what to do when you are stumped.

I think I am close to my fix and I can't wait to share it with you! In the mean time, if you have any suggestions, please send them on over! I am trying almost everything(except for the person who told me to use MORE detergent. In cloth, less is more!).

Photobucket

Thursday, May 5, 2011

Convertible Carseat shopping!!!!

Jema is now 8 months old and growing out of her "bucket" car seat so quickly. Not to mention that she prefers to sit up more vs the steep recline of the traditional bucket style seat. She has clearly let me know that she is ready for a big girl car seat aka convertible seat. Then begins the dreaded part of picking a car seat that it's both SAFE and FUNCTIONAL for my #1 Gem.

My requirements were, Rated very high on the safety test, Steel reinforced framing, side impact tested, EPS foam, Allows rear facing for an extended time, 5 point harness, Head support, not too bulky, not overpriced.

The Contenders :

BRITAX BOULEVARD 

And


SUNSHINE KIDS RADIAN XTSL

Lets talk about the BRITAX first, Britax has been around forever and has proved time and time again to be a top contender in the car seat market. We took a trip to BuyBuyBaby to test out a few seats and see what Jema thought of each one. She really seemed to love the Britax boulevard and it was EASY to adjust and buckle her in. I liked how the seat hugged around her body and the softness of the seat. Also this seat fits into almost every category on my "must have" list except it doesn't have a higher weight limit for longer rear facing, and it is a very wide and bulky seat. Also I feel like the fact that we're in HOT Florida that the hugging effect that the chair offered would also contribute to overheating my already toasty baby. But the real deciding factor was when we put her in the car seat and installed it into the car that her feet were already touching the back seat... Which means her legs would be cramped sooner than later and since we are planning to rear face until at least 2 years old we need as much growing room weight + height as we can get. The britax only accommodates up to 35lbs rear facing....and my baby is already over 20 lbs at only 8 months old. Overall I think it's a great car seat but it fell short on a few factors that were important to me as a consumer and mom. :)  here's some Info about the BRITAX Boulevard courtesy of Amazon.


*True Side Impact Protection
*Patented HUGS system, tangle-free 5 point harness with belly pad and one     pull front harness adjustment,
*Flexible buckle LATCH system
*Extra comfort padding, infant body pillow for cozy fit
*Rear facing: 5 to 35 pounds. Forward facing: At least 1 year old and 20 to 65 pounds


Now lets talk about the Sunshine kids Radian XTSL, This car seat brand is a slight newcomer to the ultra competitive car seat world. They didn't let that stop them from quickly rising to the top and I can see how they managed with an impressive safety feature list and some really cool new angles. At first sight the Sunshine Radian looks different than a lot of the other convertible car seats in it's class, it's slimmer and taller frame give it a sleeker look. I had a hard time believing that it would fit rear facing in my car b/c of the height of the chair back - but it fit with no problem. We did the same thing as listed above in the Britax review - took a trip to BuyBuy Baby and put Jema in it to evaluate the seat. Right away we noticed that it was a little bit harder to install...not hard at all, but not as easy as the BRITAX. Sunshine Kids offers something called the SUPER LATCH system which is the only metal latch that is rated for use up to 80lbs. Impressive in my book of safety! Also the Radian is rated to use rear facing up to 45 lbs. - that's 10 lbs higher than the BRITAX , and more than 10 lbs on some other brands that I looked into.Another great feature I noticed right away was the leg room Jema had when buckled into the seat - Her feet do not touch the seat back and still have a few inches before they will touch, letting me know that she has plenty of growing room before facing her forward. Side Note*New research is stating that children should stay rear facing until at least 2 years of age.... Like I said it's NEW research, I don't want to offend people who did not rear face until 2.*
The Radian is rated very highly by NCAP - See below for some facts courtesy of Sunshine Kids.com


New Car Assessment Program (NCAP) is 35 mph crash testing used to determine a vehicle's safety. NCAP testing has been required for all cars since 1981, but is not required for child car seats. NCAP simulates a severe accident - almost double the impact forces of a standard crash test. Many safety advocates believe NCAP should be a required, 'fail-safe' test for all child car seats.


Safety Features

  • Steel alloy frame and aluminum reinforced sides
  • Adjustable head support, reinforced for complete side-impact safety
  • Energy-absorbing EPS foam panels on all sides
  • Safestop® energy-absorbing harness system
  • SuperLATCH™ installation up to 80 lbs – no seat belt required
  • Easy-Tite™ adjuster for quick and easy tightening, installs in 1 minute
  • Rubber bottom grips for no-slip installation
  • 5 shoulder and 3 buckle positions for proper harness fit
  • Forward and rear facing tether system
We ended up choosing the Sunshine kids Radian XTSL for the simple reason that it allows for longer rear facing between the higher weight capacity and the leg room allowance. I love the BRITAX as well and I highly suggest that carseat if extended rear facing is not at the top of your priority list and also if you don't plan to have more than one carseat in the back seat. Sunshines slim design allows 3 carseats to fit at once.
We purchased our Radian at BuyBuy Baby last week during a sale and also used a 20% off coupon and snagged this awesome seat for $184!!!!


Photobucket